Skip to content
  • iImagine
  • Register
  • Log In

Web Development School

Learning made easy.

  • Books
    • Beginning Web Development with ASP.Net Core & Client-Side Technologies
      • TOC
      • Part 1
        • Chapter 1: Static HTML – Designing the landing page
      • Part 2
        • Chapter 2: ASP.Net Core – Let’s talk Dynamic
        • Chapter 3: Introduction to ASP.Net Core MVC
          [ASP.Net Core v9]
      • Part 4
        • Chapter 7: Using Server Side & Client Side technologies together
          [ASP.Net Core v7 & Angular 15]
  • Environment Setup
    • Installing Angular
    • Installing Visual Studio 2022
    • Installing SQL Server 2022 Express
    • Installing Postman
    • Installing Git for Windows
  • Blog
  • iImagine WebSolutions
  • Events
  • Learning Videos
  • Toggle search form

Installing Angular

Posted on June 13, 2023December 23, 2023 By Scott No Comments on Installing Angular

In order to get Angular installed on our machine, we first need to install node.js. Installing node.js will give us a tool called npm (node package manager). We can then use npm to install Angular and the Angular CLI. (CLI stands for command line interface).

Table Of Contents
  1. Install Node.js
    • Check NPM version
  2. Install Angular
    • Check Angular version

Install Node.js

Go to https://nodejs.org/en and download version 18.16.0 (at the time of this writing).

Double click the node-v18.16.0-x64.msi file to start the installation.

The Node.js Setup dialogue will startup with a message to wait while the setup wizard prepares itself.

On the next screen, the Next button will be enabled. Click it to continue with the installation.

Accept the license agreement and click Next again.

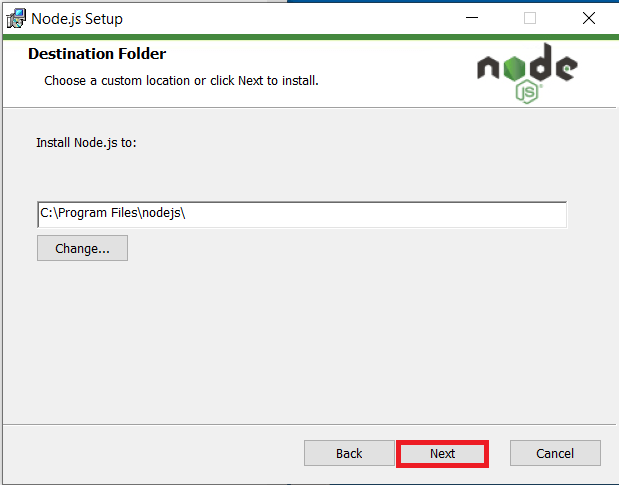
Accept the default installation folder and click Next.

On the Custom Setup Screen click Next.

Click Next on the Tools for Native Modules screen.

On the Ready to install Node.js screen, click the Install button.

Next the Installing Node.js screen will come up.

You may get a message similar from the User Control Panel. If status is not progressing the message might be hidden. Look through your open applications to find it and click yes to give the installer permission to continue.

Finally on the “Completed the Node.js Setup Wizard” screen click the Finish button.

One the installation is complete, open a command line and type the following command to see the version installed.

node -v

It should say “v18.16.0.

Check NPM version

To check that the Node.js installer also installed NPM (Node Package Manager) ok, type the following command in a command prompt.

npm -v

It should say 9.5.1

Install Angular

Now that we have npm installed we can use it to install Angular globally on our computer.

Type the following command at the command prompt.

npm install --global @angular/cli@15.2.4

Check Angular version

This will take a while to install and you will see a lot of messages in the command window. When it finishes up, type the following command to check the versions of everything we have installed so far.

ng version

You should see the Angular CLI emblem in red and the versions of everything we have installed so far to support Angular Development.

Note: If you get an error saying something to the affect that you cannot run the script because you do not have permissions to execute, open a PowerShell command prompt in administrator mode by right clicking on the PowerShell icon and clicking run as administrator and run the following command.
set-executionpolicy remotesigned

Related

Angular, Environment Setup, See All

Post navigation

Previous Post: History of ASP.Net Core
Next Post: Installing Visual Studio 2022

More Related Articles

History of ASP.Net Core ASP.Net
Installing Postman Environment Setup
Installing Git for Windows Environment Setup
Installing Visual Studio 2022 Environment Setup
Angular Commands Cheat Sheet Angular
Installing SQL Server 2022 Express Environment Setup

Leave a ReplyCancel reply

Chapter 1: Static HTML – Designing the landing page.

  • Static HTML – Designing the landing page.
  • Let’s get started!
  • Mock your site with HTML
  • Make CSS easy with Bootstrap
  • Mock your content
  • Introducing JavaScript
  • JavaScript Code Improvements
  • Results Data
  • Images and the HTML Image Element.
  • Revisiting Reusability for CSS and JavaScript
  • Reuse for HTML: PART 1
  • Reuse for HTML: PART 2
  • Details Page – Using a Bootstrap Component
  • Creating Links
  • Chapter One Conclusion

Chapter 2: ASP.Net Core – Let’s talk Dynamic

  • Introduction to ASP.Net Core
  • What is .Net?
  • What is ASP.Net
  • Introduction to Entity Framework Core

Chapter 3: ASP.Net MVC Core – Models, Views, and Controllers [ASP.Net Core v9]

  • Introduction to ASP.Net Core MVC
  • Create the project: ASP.Net Core MVC
  • Explore the ASP.Net Core Empty Web Project Template
  • Configure the Application for MVC
  • Create a Controller: Home Controller
  • Create a View: Index View for the Home Controller
  • Install Bootstrap using Libman
  • Create the Layout template
  • Create the Model
  • Install EF Core & Create the Database
  • Seed the Database: Loading test data
  • DI (Dependency Injection): Display a List of Vehicles
  • Repository Pattern: The Vehicles Repo
  • Unit Test 1: Home Controller Can Use Vehicle Repository
  • Unit Test 2: Vehicle Repository Can Return List
  • Add the ImagePath Migration and Thumbnail images to results
  • Pagination: Create a Custom Tag Helper
  • Sorting
  • Category Filter
  • Partial View: Break out the vehicle results
  • View Component: Create dynamic category buttons

Chapter 7: Using Server Side & Client Side technologies together. [ASP.Net Core v7 & Angular v15]

  • Intro to Full Stack Development
  • Fred’s Cars – Full Stack Development
  • Prepare the environment
  • Create the Visual Studio Solution
  • Add the ASP.Net Core Web API project
  • Add the Angular Project
  • Wire it up!
  • WeatherForecast: Understanding the basics
  • Vehicles API Controller: Mock Data
  • Vehicles Angular Component: Consuming Data
  • Routing and Navigation
  • Using a Component Library: Angular Material
  • Our first Angular Material Component: MatToolbar
  • Configuring for Saas: CSS with superpowers
  • Create the Header & Footer components
  • Displaying Results with MatTable
  • Loading: Using a Progress Spinner
  • MatTable: Client-Side Paging and Sorting
  • MatSidenav: Create a Search Sidebar
  • MatCheckbox: Category Search UI
  • Adding an image to the welcome page
  • Create the database with Entity Framework Core migrations
  • MatPaginator & PageEvent: Custom Server-Side Paging
  • Unit Testing: Custom Server-Side Paging
  • Repository Pattern: VehicleRepository
  • Unit Test: Paging in the Vehicles controller
  • Server-Side Sorting
  • Unit Tests: Sorting
  • Filter (Quick Search)
  • Unit Tests: Filter feature
  • Advanced Search: Categories
  • Unit Tests: Search by category
  • Progress Spinner: Final Fix

TOC

  • What were WebForms?
  • Enter MVC
    • Understanding MVC
    • Advantages of MVC
  • ASP.Net Core MVC – A total rewrite
  • ASP.Net Core 2 MVC – Here come Razor Pages
    • Understanding Razor Pages
  • ASP.Net Core 3 – Dropping the MVC reference
    • Understanding Blazor
  • Dropping the MVC reference
  • Hello .Net 5!
  • What’s Next? – Here comes .Net 6.

Recent Posts

  • Angular Commands Cheat Sheet
  • Installing Git for Windows
  • Installing Postman
  • Installing SQL Server 2022 Express
  • Installing Visual Studio 2022

Recent Comments

No comments to show.

Archives

  • November 2023
  • October 2023
  • June 2023
  • October 2021

Categories

  • Angular
  • ASP.Net
  • Environment Setup
  • See All
  • SQL Server
  • Visual Studio
  • Web API & Rest Services

WordPress Theme Editor

Copyright © 2025 Web Development School.

Powered by PressBook Blog WordPress theme